※旧サイトから移植したページです
RaspberryPiでファイルサーバ構築#6 2020.12.13
ながらく、更新していなくてすみません。
本日は、ファイルサーバを完成させたいと思います。
以下のコマンドを実行して、ファイルサーバアプリ「samba」をインストールします。
$ sudo apt-get install samba次に共有用フォルダを作成します。前回、RAID1のHDDをraidにマウントするように設定したので、以下のようにします。
$ sudo mkdir /raid/share
$ sudo chmod 777 /raid/share
raidフォルダ内にだれでもアクセス可能な「share」フォルダができたので、それをsambaに紐づけていきます。
「/etc/samba/smb.conf」を好きなエディタで編集していきます。以下はnanoの場合です。
$ sudo nano /etc/samba/smb.conf「/etc/samba/smb.conf」の設定は以下のようにするのがおすすめです。
[global]
  min protocol = SMB2
  max protocol = SMB2
  client max protocol = SMB3
  client min protocol = SMB3
  security = user
  dos charset = CP932
  unix charset = UTF-8
  log level = 1
  passdb backend = tdbsam
## Browsing/Identification ###

# Change this to the workgroup/NT-domain name your Samba server will part of
   workgroup = WORKGROUP                  # Windowsなどで設定されているワークグループ名

# server string is the equivalent of the NT Description field
   server string = %h server (Samba, Ubuntu)

#### Networking ####

# The specific set of interfaces / networks to bind to
# This can be either the interface name or an IP address/netmask;
# interface names are normally preferred
;   interfaces = 192.168.10.2/24 eth0     # RaspberryPiのIPアドレス

# Only bind to the named interfaces and/or networks; you must use the
# 'interfaces' option above to use this.
# It is recommended that you enable this feature if your Samba machine is
# not protected by a firewall or is a firewall itself.  However, this
# option cannot handle dynamic or non-broadcast interfaces correctly.
   bind interfaces only = yes
   map to guest = bad User

......
......

[share]
  path = /raid/share
  writeable = yes
  read only = no
  browseable = yes
  guest ok = yes
  create mode = 0777
  force create mode = 0777
  directory mode = 0777
  force directory mode = 0777
他にもファイルに書かれているものもありますが、…..の部分で省略されていると思ってください。
また、WindowsのワークグループやRaspberryPiのIPアドレスがわからない人は、Google先生にでも聞いて調べてください。
以下のコマンドで、設定ファイルが正常か確認します。
$ sudo testparmエラーがなければ、sambaを実行します。
$ sudo systemctl restart smbd nmbdこれで、Windowsマシンから「/raid/share」(Macマシンも)にアクセスできるようになりました。
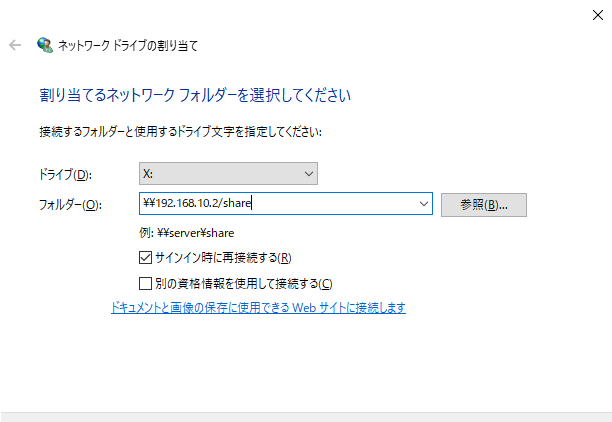
ネットワークドライブの割り当てから以下のように設定して、完了をクリックするとエクスプローラーから簡単にアクセスができるようになります。
「CrystalDiskMark」を使って転送速度を計測してみたいと思います。

まずまずといった、速度が出ているのでこれで良しとしようと思います。
頻繁にデータを読み書き用ではなく、データのバックアップ用なので。
気が向いたら、アクセス権限を付けた共有に変更したいと思います。
関連記事
・ RaspberryPiでファイルサーバ構築#1
・ RaspberryPiでファイルサーバ構築#2
・ RaspberryPiでファイルサーバ構築#3
・ RaspberryPiでファイルサーバ構築#4
・ RaspberryPiでファイルサーバ構築#5
・ RaspberryPiでファイルサーバ構築#6